Bold 3D Acrylic Nail Art: 15 Textured Design Ideas
You know that feeling when you see someone’s nails and you literally can’t stop staring? That’s exactly what happens with bold 3D acrylic nail art. I’ve been obsessed with textured designs for years now, and honestly, flat nails just don’t hit the same anymore. Whether you’re scrolling through Instagram getting serious nail envy or you’re ready to take your manicure game to the next level, these 15 textured design ideas will have you booking that salon appointment faster than you can say “nail goals.” Click here to level up your fashion game → What suits on you!
1. Chunky Glitter Mountain Peaks
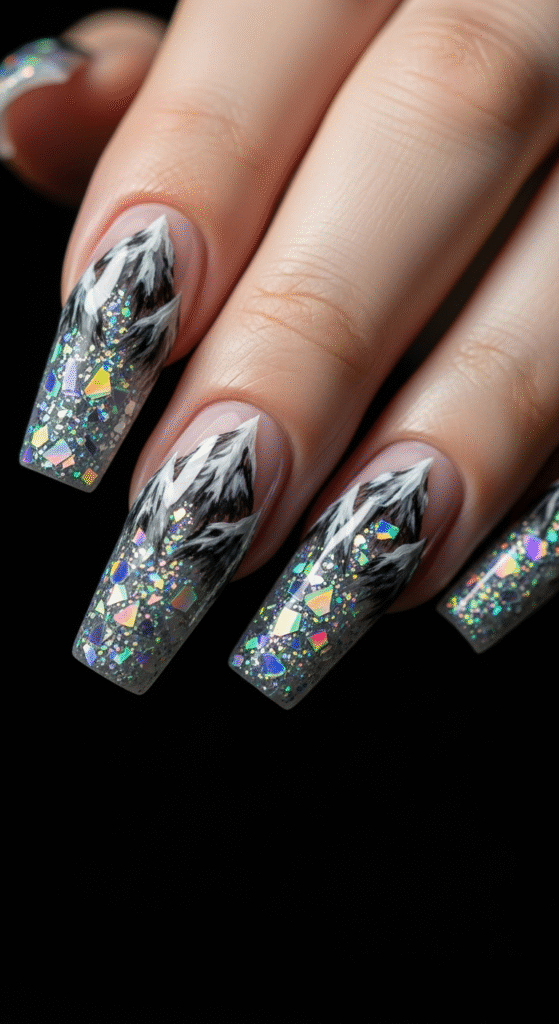
Let’s start with something that screams drama – chunky glitter mountain peaks! I love creating these textured ridges using thick acrylic and embedding oversized holographic glitter pieces. The key here is building up the acrylic in uneven, jagged formations that catch light from every angle.
Pro tip: Use different sized glitter pieces to create depth. The bigger chunks go on the peaks, while fine glitter fills the valleys. This creates an amazing textural contrast that photographs beautifully under any lighting.
The best part? You can customize the color scheme to match any vibe. I’ve done rose gold mountains for weddings and neon rainbow peaks for festival season. Each design tells its own story.
2. Sculpted Rose Garden Extravaganza
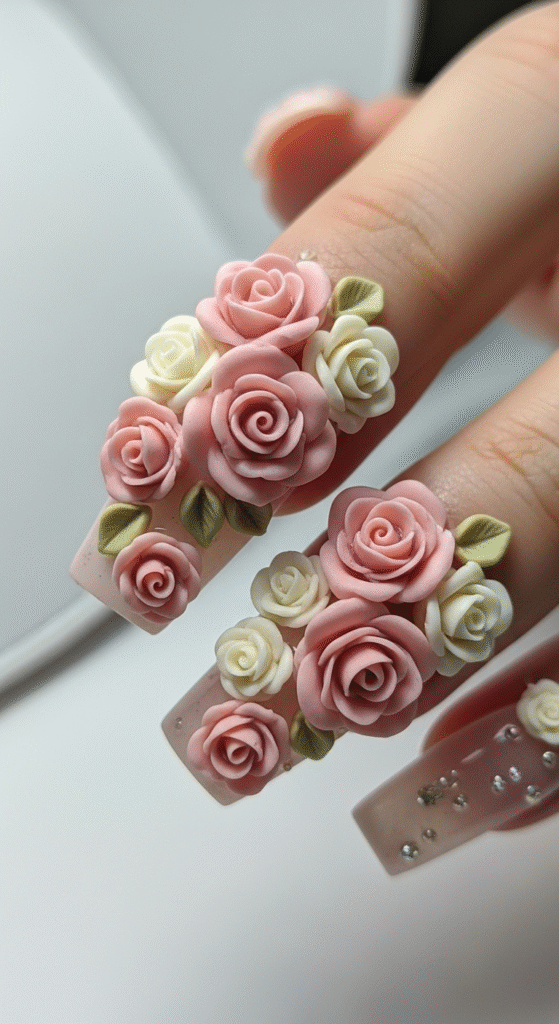
Ever wondered why some people can pull off literal flower gardens on their fingertips? It’s all about the sculpting technique! I use colored acrylic to hand-sculpt tiny roses, complete with layered petals and realistic curves.
Building these roses requires patience, but the payoff is incredible. You start with a small acrylic ball, then use a fine brush to pull and shape individual petals. Each rose takes about 10 minutes to perfect, but when you’ve got five fingernails covered in these beauties, people notice.
Color combinations that work:
- Classic red roses with green leaves
- Pastel pink and cream for romantic vibes
- Deep burgundy and gold for luxury feels
- White roses with silver accents for weddings
3. Geometric Crystal Formations
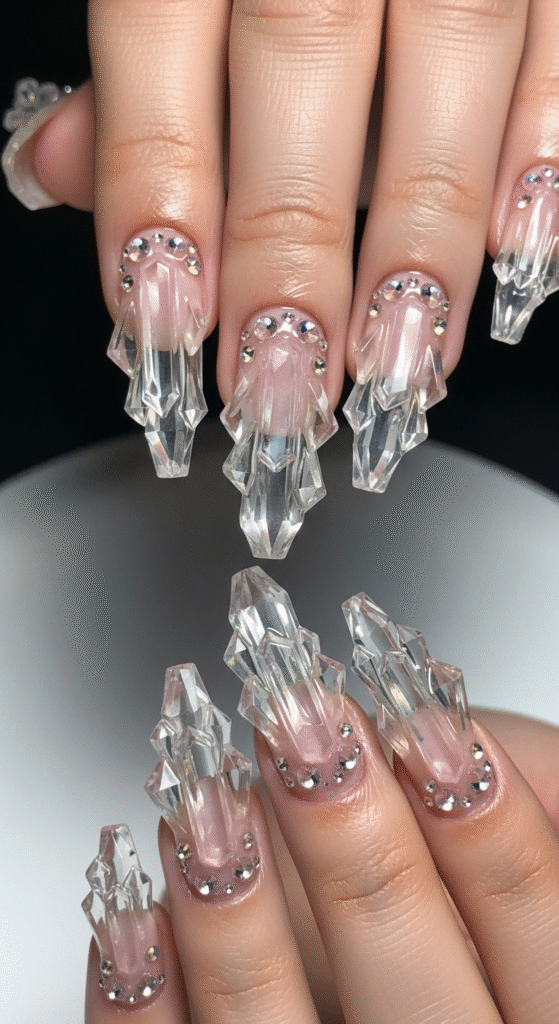
Geometric crystal designs bring out my inner math nerd 🙂 These angular, sharp-edged formations create stunning 3D effects that look almost otherworldly. I build them using clear or colored acrylic, shaping each facet to catch and reflect light perfectly.
The technique involves creating triangular and diamond-shaped protrusions at different heights. Some crystals jut out dramatically, while others remain more subtle. This variation creates visual interest and prevents the design from looking too uniform.
What I love about crystal formations is their versatility. You can go full galaxy goddess with iridescent colors, or keep it minimal with clear crystals over a nude base. Both approaches look absolutely stunning.
4. Textured Animal Print Perfection
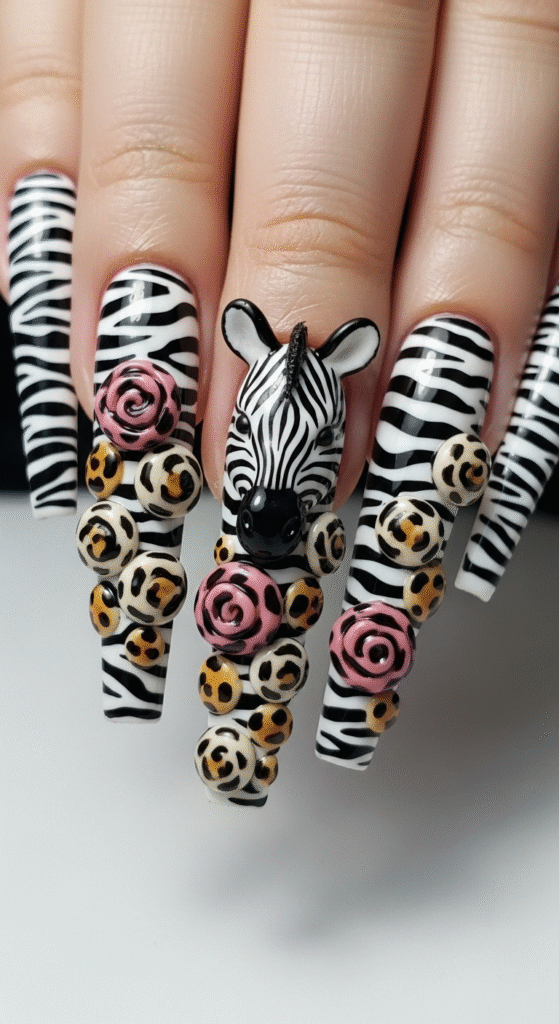
Animal prints get a major upgrade when you add texture! I’m talking raised zebra stripes, bumpy leopard spots, and tactile snake scales. These aren’t your grandmother’s animal prints – they’re bold, dimensional, and impossible to ignore.
For zebra stripes, I use black acrylic to build raised lines over a white base. The strips have actual height and width, creating shadows and depth. Leopard prints work similarly, but with circular raised spots in varying sizes.
Snake scale technique breakdown:
- Start with a base color
- Use a small brush to create overlapping scale shapes
- Build each scale slightly higher than the last
- Finish with a glossy topcoat for that authentic reptilian shine
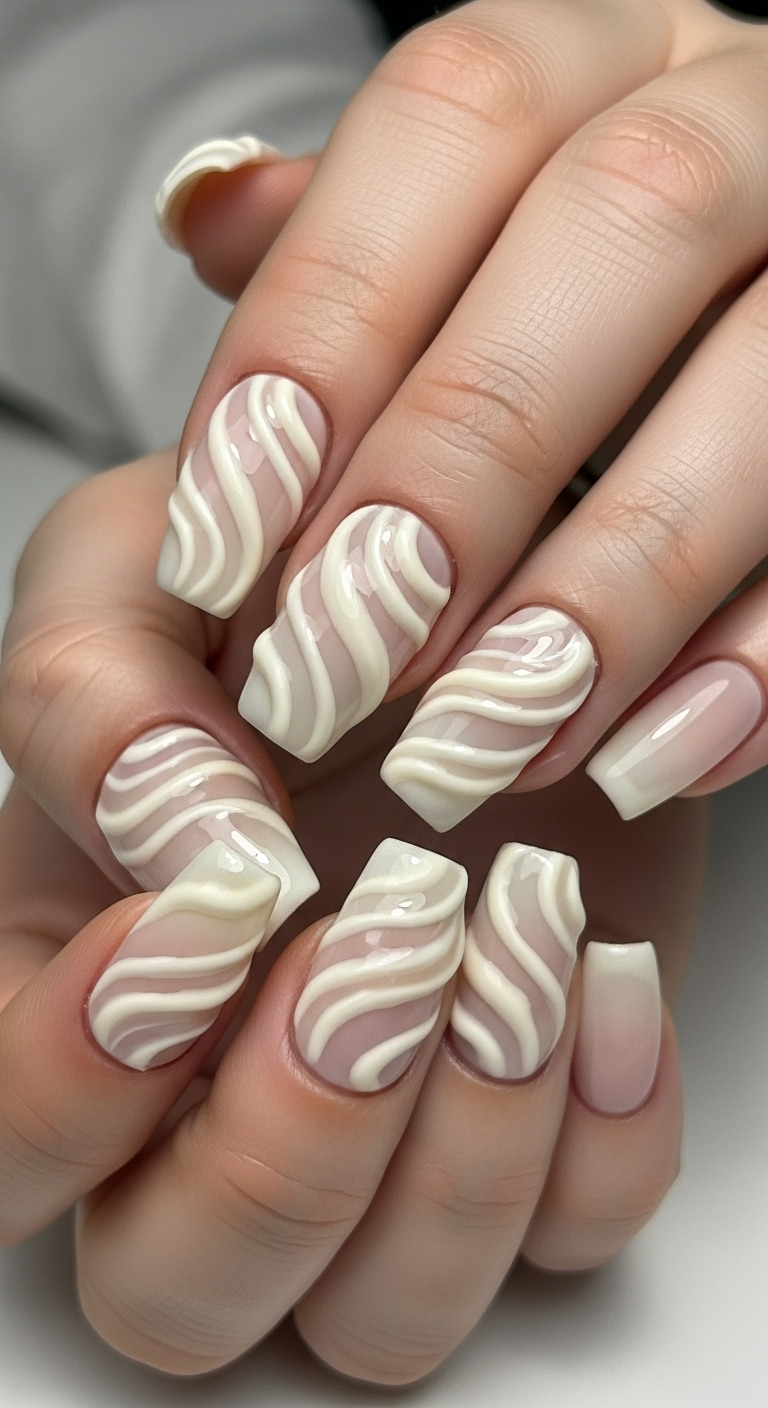
5. Whipped Cream Swirl Delights

These designs always make me hungry! Whipped cream swirls use white or cream-colored acrylic built up in soft, flowing curves that mimic actual whipped cream. The texture is smooth yet dimensional, creating an almost edible appearance.
I achieve this look by applying thick acrylic in circular motions, building up layers to create natural-looking swirls. The key is keeping the movements fluid and organic – too structured, and it looks artificial.
These work beautifully as accent nails paired with simpler designs on the other fingers. Add a tiny plastic cherry on top, and you’ve got yourself a dessert-themed masterpiece!
6. Volcanic Rock Texture Magic
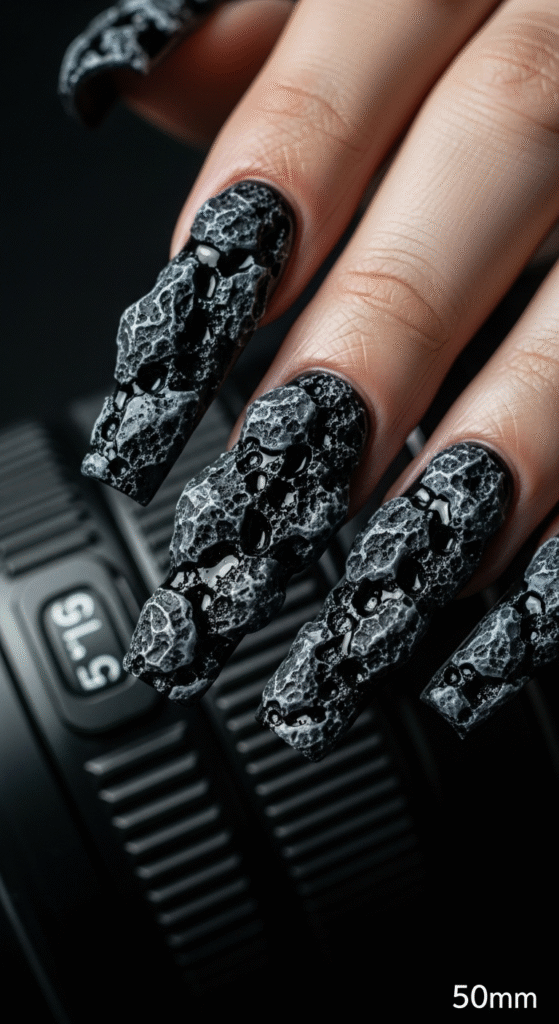
Want something edgy? Volcanic rock textures bring serious attitude to any manicure. I create these using a stippling technique with black, gray, and charcoal acrylics, building up a rough, porous surface that looks incredibly realistic.
The texture comes from dabbing the acrylic with a makeup sponge while it’s still wet. This creates tiny holes and irregular surfaces just like real volcanic rock. I usually finish with a matte topcoat to enhance the natural stone appearance.
Color variations that work:
- Classic black and gray
- Deep purple and silver for a mystical vibe
- Bronze and copper for warmth
- White and gray for marble effects
7. Seashell and Pearl Underwater Fantasy
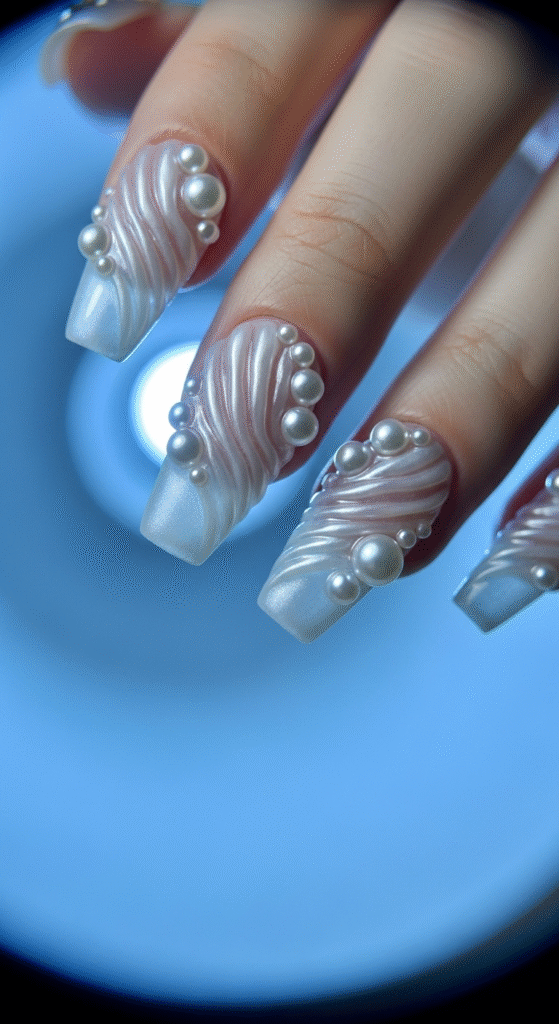
Beach vibes never go out of style! Seashell textures combine smooth, curved surfaces with ridged details that mimic real shells. I sculpt these using peachy-pink acrylics, adding tiny ridges and curves for authenticity.
Pearls add the perfect complement – I use white acrylic to create perfect spheres at various sizes. Some pearls sit flush with the nail surface, while others protrude dramatically for added dimension.
The combination creates an underwater fantasy that’s both elegant and playful. I love adding tiny starfish or coral details to complete the oceanic theme.
8. Spiky Punk Rock Rebellion
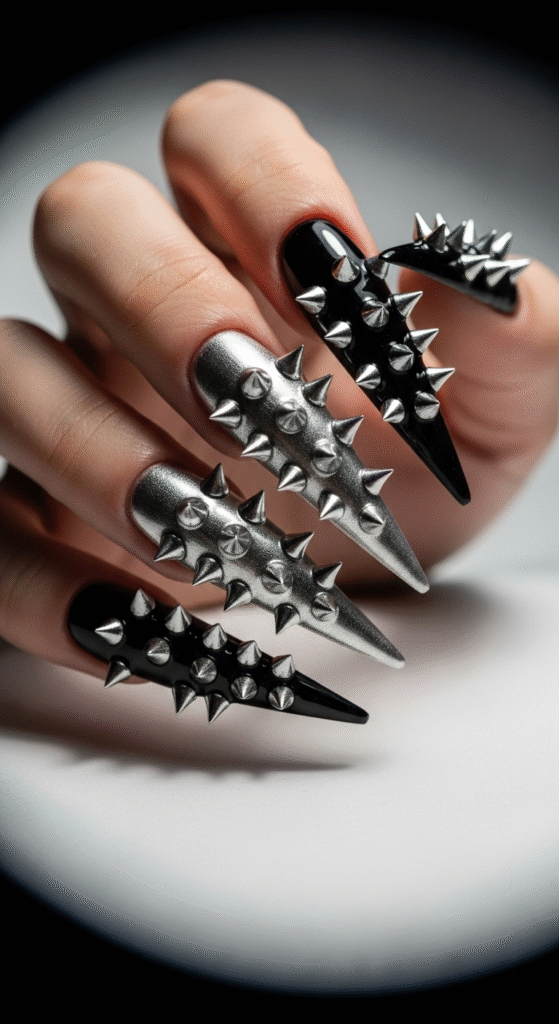
Sometimes you just need nails that match your attitude! Spiky punk rock designs use sharp, pointed acrylic extensions that jut out at dramatic angles. These aren’t for the faint of heart – they’re bold, edgy, and definitely make a statement.
I typically use black or metallic acrylics for the spikes, varying their lengths and angles for visual interest. The base can be anything from classic black to neon colors, depending on your personal style.
Safety note: These designs require careful daily navigation. FYI, typing becomes an adventure, and forget about putting on tight clothing easily!
9. Fluffy Cloud Nine Textures
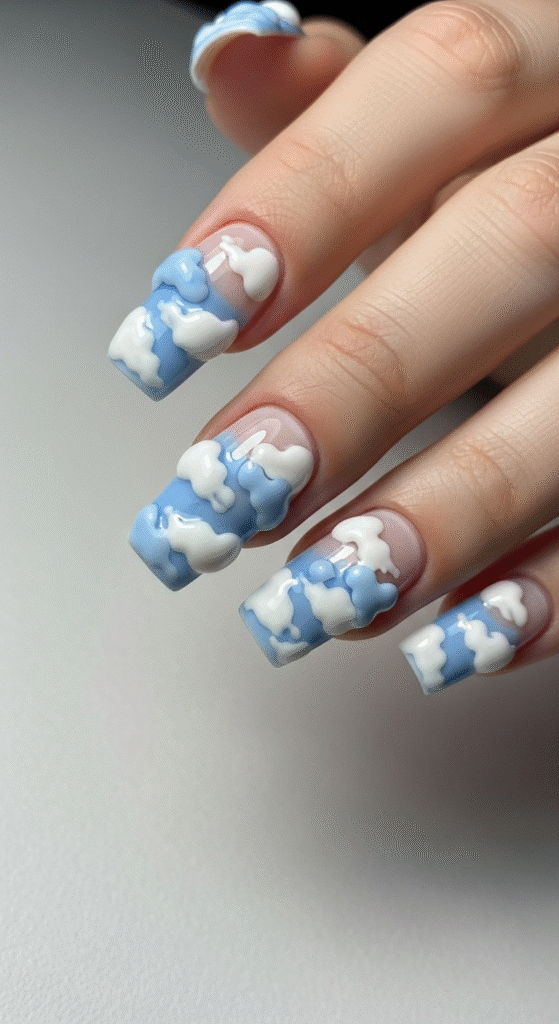
Cloud textures bring softness to 3D nail art. I create these using white and light blue acrylics, building up puffy, irregular shapes that look like miniature cumulus clouds sitting on your nails.
The technique involves applying thick acrylic in dabbing motions, creating natural-looking lumps and bumps. I blend different shades of white and blue to add depth and realism to each cloud formation.
These designs photograph beautifully and add a dreamy, ethereal quality to any look. They’re perfect for spring and summer, or anytime you want to carry a little piece of sky with you.
10. Intricate Lace Pattern Elegance
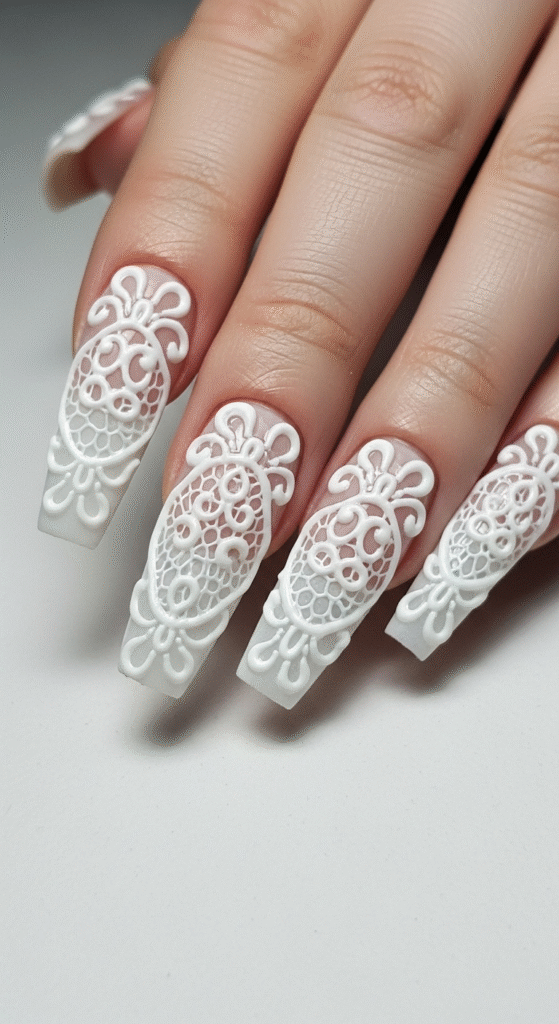
Lace patterns require serious skill, but the results are absolutely breathtaking. I use fine brushes and white or cream acrylic to create delicate, raised lace designs that look like actual fabric embedded in the nail.
The key is working in thin layers, building up the pattern gradually. Each loop and curve must connect seamlessly with the next, creating that characteristic lace flow. It’s time-consuming work, but the elegant results are worth every minute.
These designs work beautifully for weddings, formal events, or anytime you want to add sophisticated texture to your manicure.
11. Dragon Scale Armor Protection
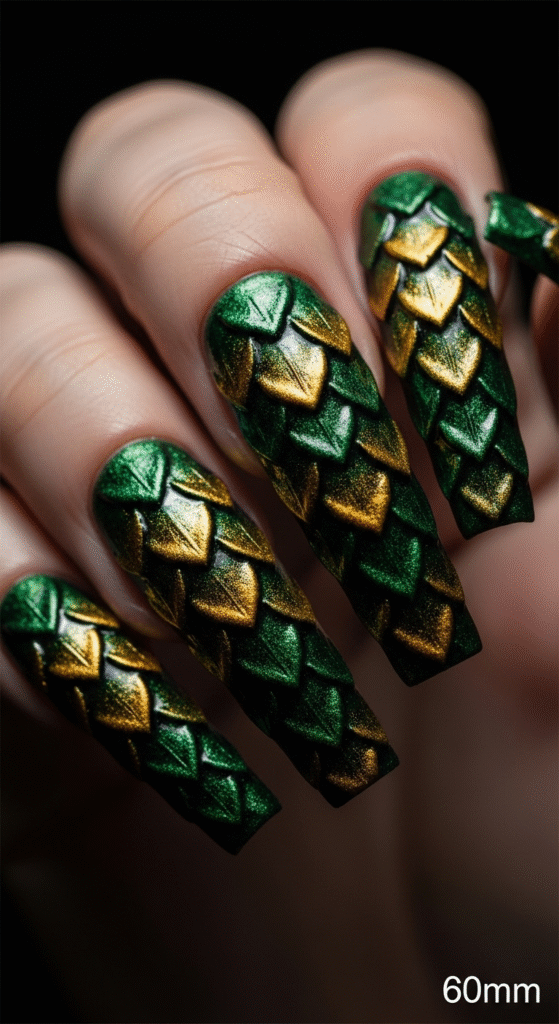
Dragon scales take animal prints to a fantasy level! I create these using metallic acrylics in greens, golds, and bronzes, building up overlapping scale shapes that look like actual armor plating.
Each scale is individually sculpted and positioned to overlap naturally with its neighbors. The metallic finish adds that essential fantasy element, making your nails look like they belong on a mythical creature.
Color combinations I love:
- Emerald green with gold highlights
- Deep purple with silver accents
- Copper and bronze for warmth
- Black with rainbow holographic effects
12. Succulent Garden Miniatures
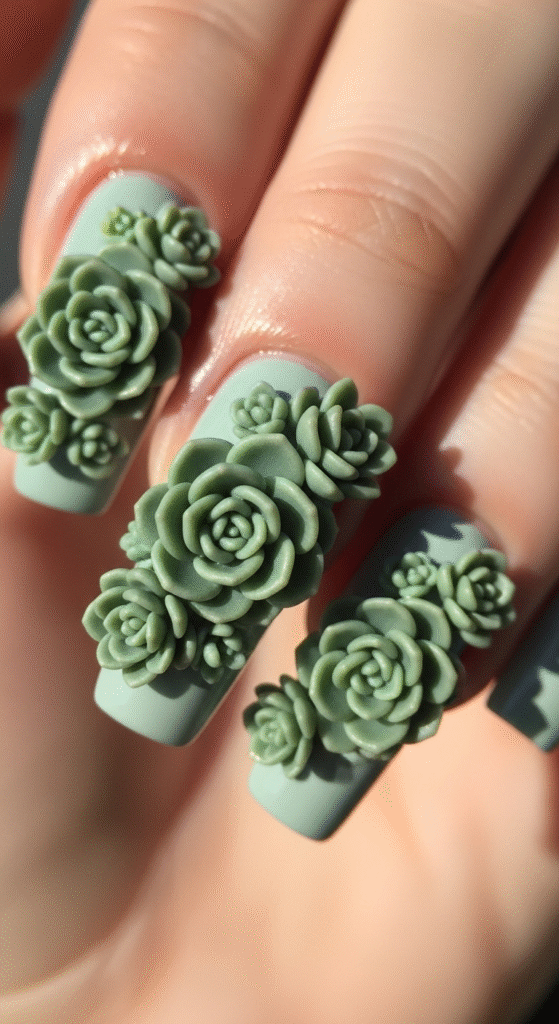
Succulents bring that trendy botanical vibe to nail art! I sculpt these using various shades of green acrylic, creating the characteristic thick, fleshy leaves that make succulents so recognizable.
The technique involves building up individual leaf shapes in layers, with each leaf slightly overlapping the others. Different succulent varieties require different approaches – some have pointed leaves, others are more rounded and bulbous.
Adding tiny details like water droplets (clear acrylic dots) or dusty blue-green coloring makes these designs incredibly realistic. They’re perfect for nature lovers or anyone wanting to carry a little garden wherever they go.
13. Frozen Ice Crystal Wonderland
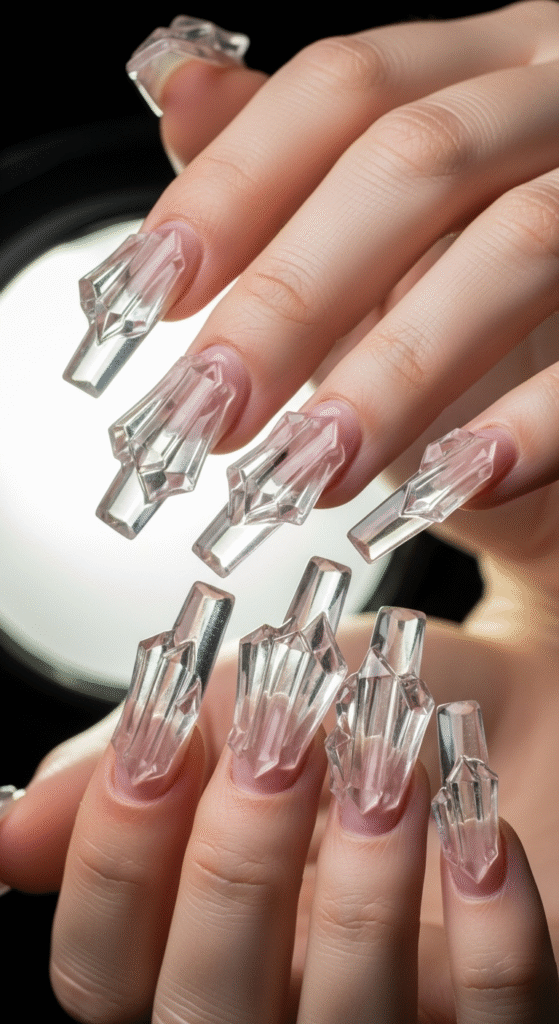
Ice crystals create magical winter wonderlands on your fingertips. I use clear and light blue acrylics to build sharp, angular formations that look like actual ice formations you’d see on a frozen window.
The key is creating irregular, organic shapes while maintaining that characteristic crystal structure. Some formations are tall and dramatic, others are shorter and more subtle. The variation creates natural-looking ice patterns.
Finishing touches that make the difference:
- Iridescent topcoat for that frosty shimmer
- Tiny silver glitter for sparkle
- White acrylic “snow” at the base
- Blue tinting for realistic ice coloring
14. Marble Stone Sophistication
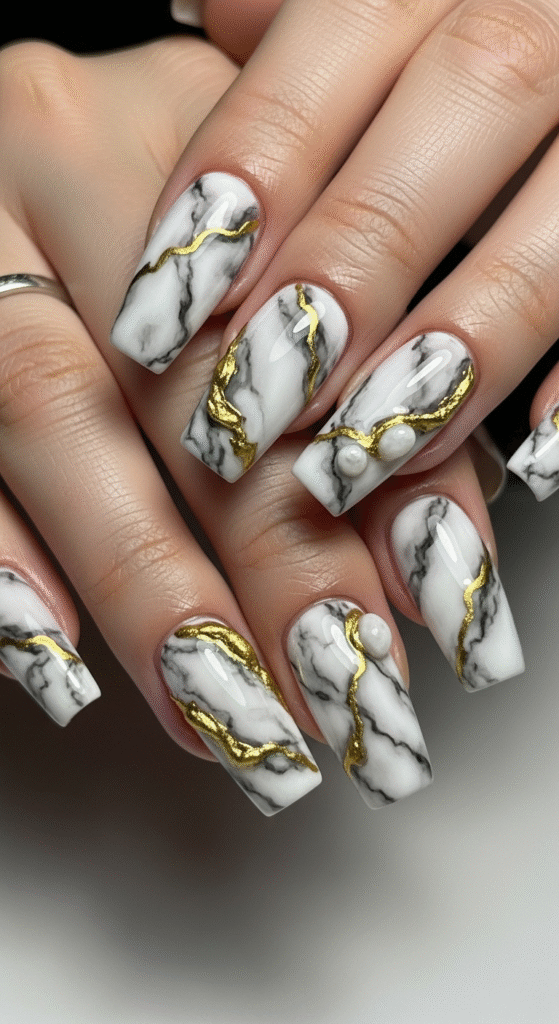
Marble textures bring luxury vibes to any look. I create these using white, gray, and black acrylics, blending them while wet to create natural-looking veining patterns with actual dimensional texture.
The raised veining is what sets these apart from flat marble designs. I use a fine brush to pull colored acrylic across the surface, creating lines that have both color and height variations.
Different marble types require different color combinations. Carrara marble uses whites and grays, while Calacatta features more dramatic gold veining. Each type brings its own sophisticated energy to the design.
15. Honeycomb Geometric Perfection
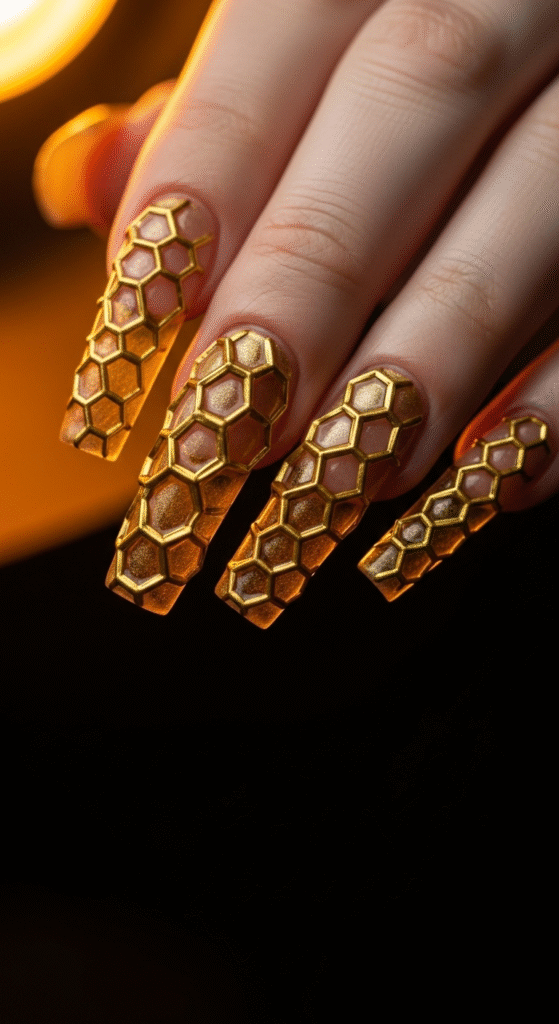
Honeycomb patterns combine geometric precision with natural inspiration. I create these using golden yellow acrylics, building up hexagonal cells that form perfect honeycomb structures across the nail surface.
Each hexagon is individually crafted to connect seamlessly with its neighbors. The raised edges create shadows and depth, while the golden coloring adds warmth and richness to the overall design.
Bonus elements that enhance the look:
- Tiny bee decorations
- Glossy “honey” filling in select cells
- Amber and brown color variations
- Matte topcoat for natural texture
Making Your 3D Dreams Reality
Creating bold 3D acrylic nail art takes practice, patience, and the right tools. I’ve learned through years of trial and error that rushing the process never leads to good results. Each design needs time to cure properly, and building up textures requires working in thin layers.
Essential tools for success:
- High-quality acrylic paints and powders
- Fine detail brushes in various sizes
- Dotting tools for texture work
- Good lighting for precision work
- Patience (seriously, this can’t be rushed!)
The most important thing? Don’t be afraid to experiment! Some of my favorite designs happened by accident when I was trying something completely different. IMO, the best nail art comes from playing around and seeing what happens.
Whether you’re attempting these at home or bringing inspiration photos to your nail technician, remember that bold 3D designs are all about expressing your personality. Your nails become tiny canvases for storytelling, and every texture tells a different tale.
So go ahead – pick your favorite design from this list and make it happen. Your fingertips deserve to be as extra as you are, and trust me, once you go 3D, flat nails will never satisfy you again!