10 Sunkissed Makeup Ideas for Golden Hour Vibes
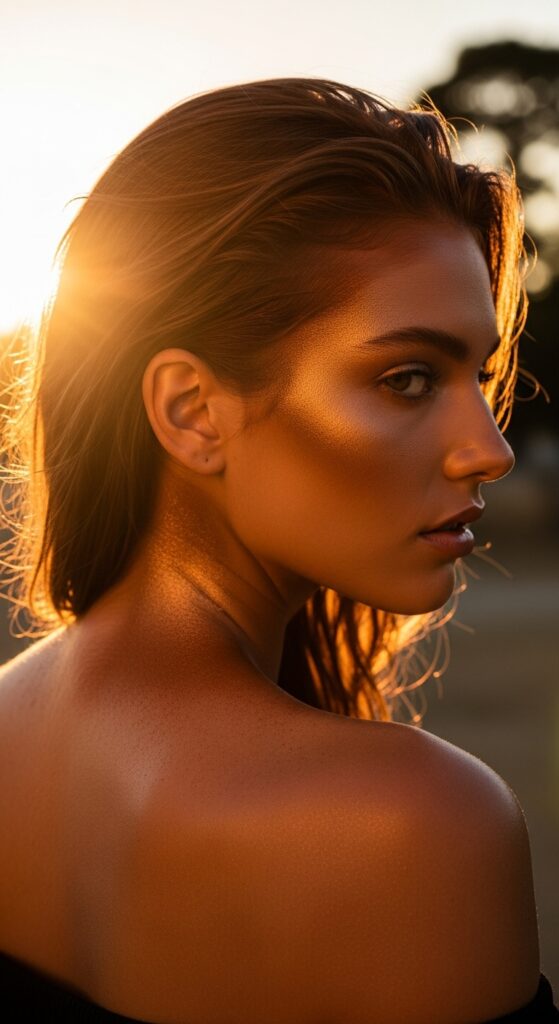
Picture this: you’re scrolling through Instagram at 6 PM, and every selfie looks like it was shot by a professional photographer. That magical golden hour glow makes everyone look like they stepped out of a dreamy filter, right? Well, here’s the thing—you don’t need perfect lighting to nail that sun-kissed look. I’ve spent way too many evenings trying to recreate that ethereal golden hour magic with makeup, and let me tell you, it’s totally doable with the right tricks up your sleeve. Click here to level up your fashion game → What suits on you!
After countless experiments (and a few makeup disasters I’d rather forget), I’ve cracked the code on achieving that effortless, luminous glow that makes people ask, “Wait, did you just come back from vacation?” Spoiler alert: most of the time, I haven’t left my apartment in three days 🙂
1. The Classic Bronze Goddess
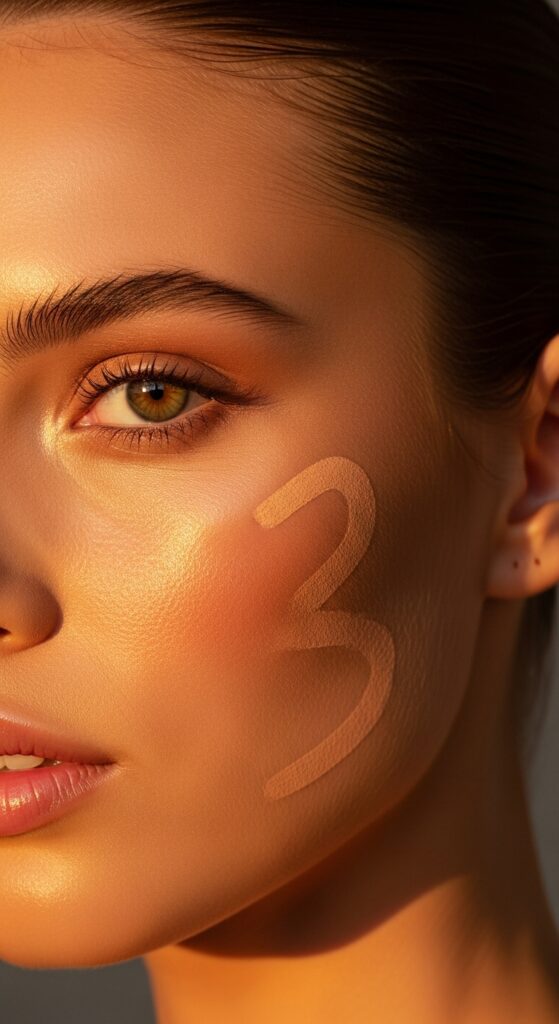
Let’s start with the obvious queen of sunkissed looks—the bronze goddess vibe. This isn’t about slapping on some orange bronzer and calling it a day (we’ve all been there, haven’t we?).
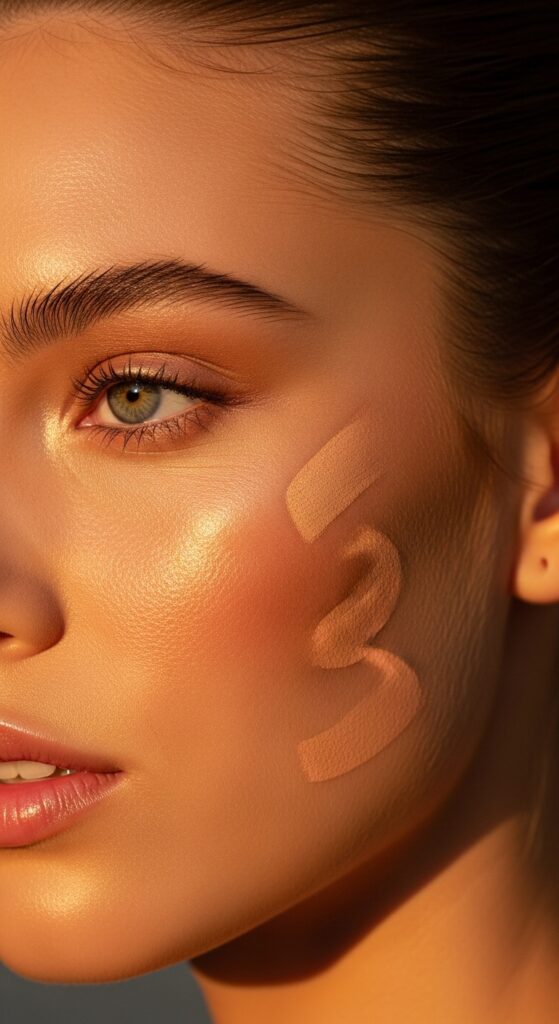
I swear by using a matte bronzer that’s only one to two shades darker than your natural skin tone. Here’s my game-changing technique: apply it in a “3” shape on each side of your face. Start at your temples, sweep down to your cheekbones, then finish along your jawline.
Key products that actually work: • A fluffy angled brush for precise application • Cream bronzer for that natural, skin-like finish • Setting powder to lock everything in place
The trick? Build gradually. I learned this the hard way after looking like an Oompa Loompa for my friend’s wedding photos. Trust me, you can always add more, but scraping off excess bronzer is a nightmare.
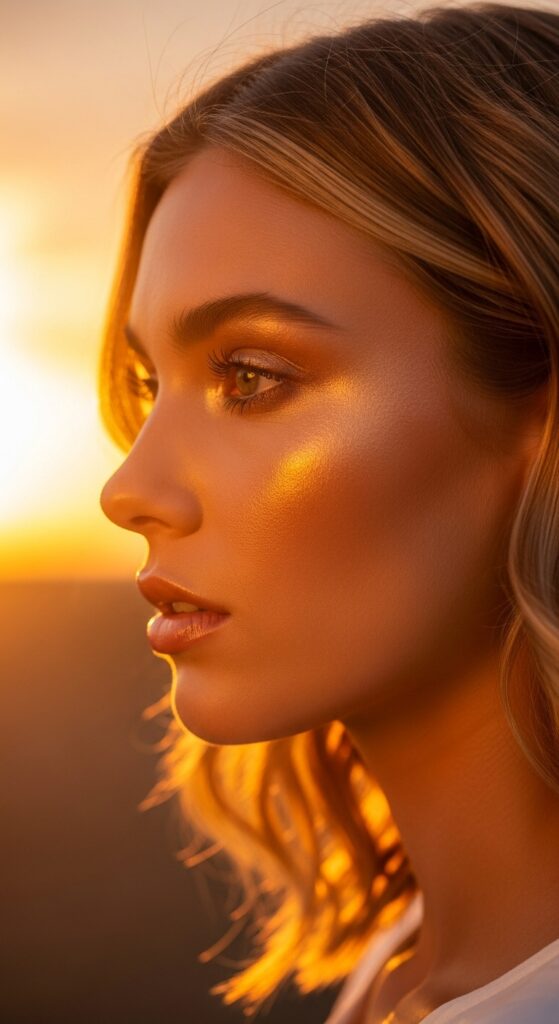
2. Dewy Skin That Screams “I Drink 8 Glasses of Water Daily”
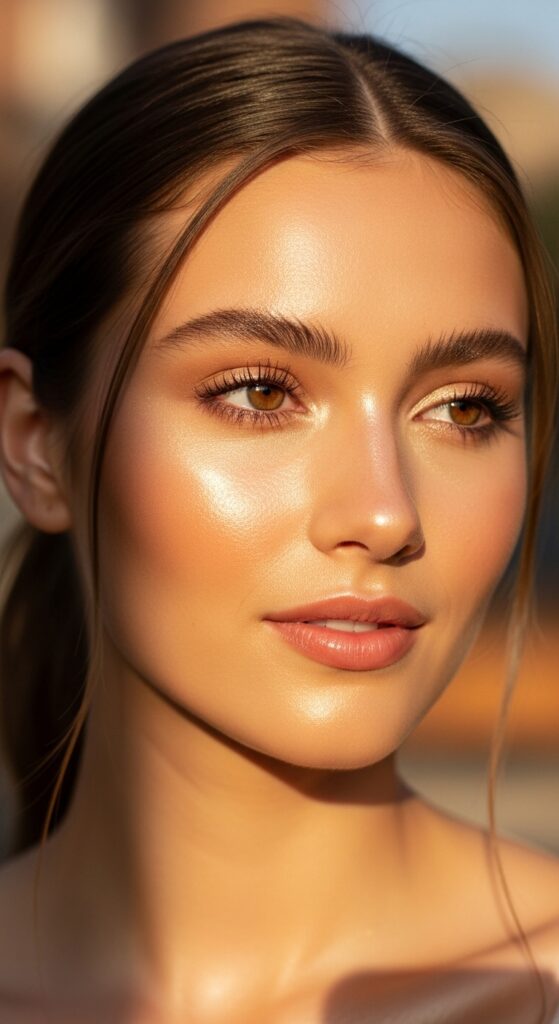
Ever wonder why some people always look like they’re glowing from within? It’s not always good genes—sometimes it’s strategic highlighting and the right base products.
I mix a tiny drop of liquid highlighter directly into my foundation. This creates that lit-from-within glow that photographs beautifully in any lighting. For extra oomph, I apply cream highlighter to the high points of my face before setting with powder.
The golden hour effect comes from focusing on these areas: • Cheekbones (obviously) • Bridge of the nose • Cupid’s bow • Inner corners of your eyes
Pro tip I wish someone had told me earlier: warm-toned highlighters work magic for this look. Skip the icy champagne shades and go for golden, peachy, or bronze-toned highlights instead.
3. Sunset Eyes with Warm Terracotta Tones
Nothing says golden hour like eyeshadow that mimics an actual sunset. I’m obsessed with terracotta and burnt orange shades—they make every eye color pop like crazy.
My foolproof sunset eye formula starts with a warm terracotta shade across the entire lid. Then I deepen the outer corner with a rich burnt orange or deep coral. The magic happens when you blend a golden shade right in the center of the lid and inner corners.
The color story that never fails me: • Base: Warm terracotta or peachy brown • Depth: Burnt orange or deep coral • Highlight: Golden champagne or warm ivory
Here’s where I got smart about application—I use my finger to pat that golden shade right on the center of my lids. Brushes are great, but fingers give you that intense, metallic payoff that screams expensive makeup (even when you’re using drugstore products).
4. Peachy Keen Monochromatic Magic

Monochromatic makeup is having a major moment, and peach tones are perfect for that sunkissed vibe. I use the same peachy shade on my eyes, cheeks, and lips—it’s foolproof and always looks put-together.
The beauty of this look? You literally can’t mess it up. Pick one gorgeous peach tone and apply it everywhere. I start with a cream blush on my cheeks, blend the same shade on my eyelids, and finish with a peachy lip color.
Why this works so well: • Creates natural dimension without harsh lines • Looks effortless (because it kind of is) • Photographs beautifully in any lighting • Takes about five minutes total
Sometimes I add a slightly deeper peachy-brown shade in my crease just for a bit more definition, but honestly? The monochromatic approach is so forgiving that even beginners can nail this look on the first try.
5. Golden Hour Highlight Placement That Actually Makes Sense
Let’s talk about highlighting strategy because I see so many people getting this wrong. The goal isn’t to blind people from space—it’s to mimic where natural sunlight would hit your face.
I focus on areas where the sun would naturally create that gorgeous glow. The key is using a warm-toned highlighter instead of those super cool-toned ones that can look harsh in regular lighting.
My strategic highlighting map: • High points of cheekbones • Down the bridge of your nose (not the tip—learned that one the hard way) • Center of your forehead • Just above your lip line • Collar bones if you’re wearing something low-cut
The game-changer? I use a setting spray on my brush before applying highlighter. It intensifies the payoff and makes the glow look more natural and skin-like rather than powdery.
6. Coral Lips That Won’t Quit
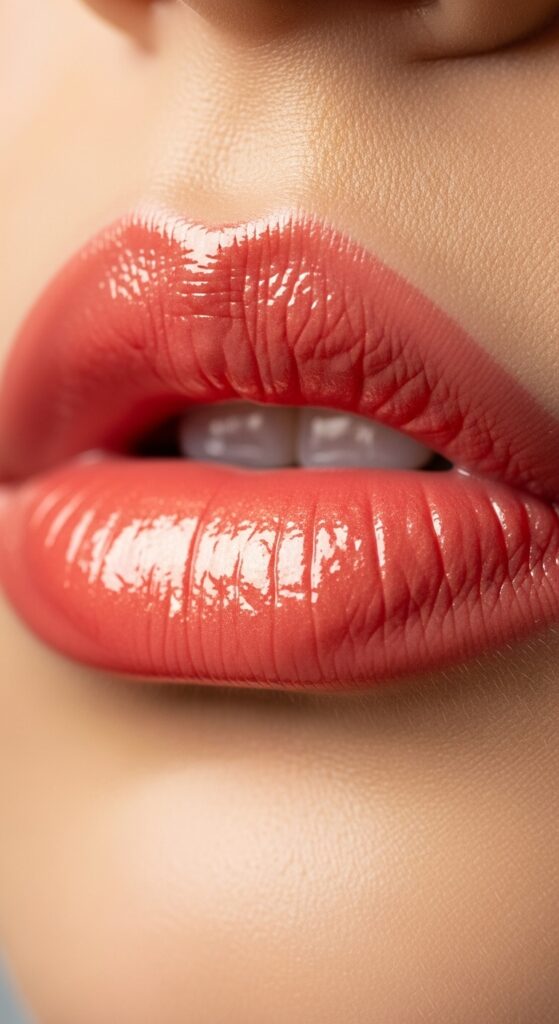
Coral lips are the unsung heroes of sunkissed makeup. They’re warm enough to complement bronze tones but bright enough to make your whole face look more vibrant. IMO, coral is way more flattering than hot pink for this aesthetic.
I’ve tried every coral lipstick known to humanity, and here’s what I’ve learned: cream formulas photograph better than matte ones for this look. The slight sheen mimics that natural lip moisture you get from being in warm, sunny weather.
My coral lip strategy: • Start with a lip liner in a matching coral shade • Apply lipstick with a brush for precision • Add a touch of clear gloss to the center for dimension
Want to know a secret? I sometimes mix a tiny bit of golden lip gloss with my coral lipstick. It creates this custom sunset shade that’s absolutely gorgeous and looks expensive as hell.
7. Soft Definition with Warm Brown Liner

Forget harsh black liner for sunkissed looks—warm brown liner is where it’s at. It defines your eyes without looking too dramatic or contrasting with those warm, golden tones.
I use brown liner on both my upper and lower lash lines, but here’s the twist—I smudge it slightly with a small brush. This creates that effortless, “I woke up like this” definition that perfect for golden hour vibes.
The technique that changed my life? I line my eyes, then immediately go over the line with a matching brown eyeshadow. It softens everything and makes the liner look more natural and blended.
8. Flushed Cheeks with Peachy-Pink Blush
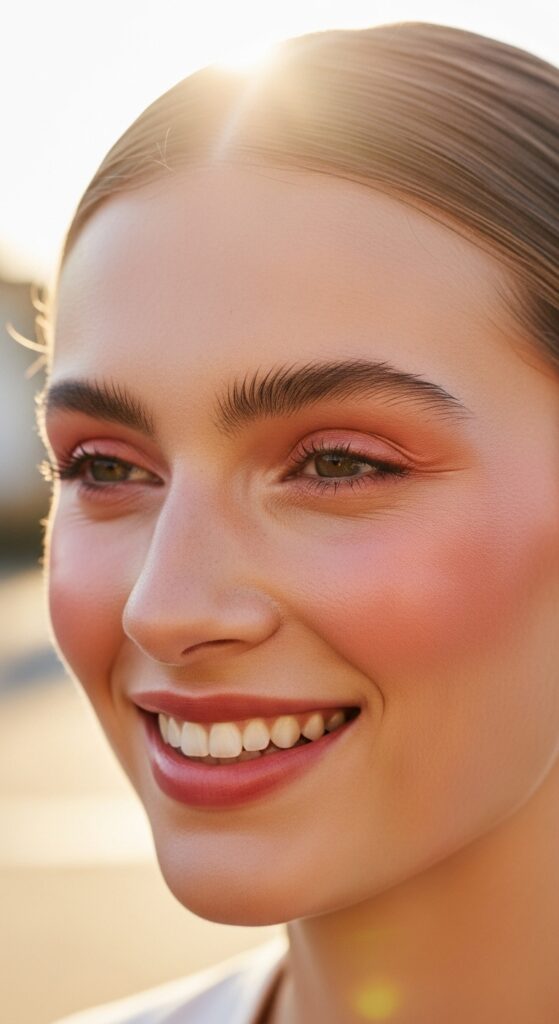
The right blush can make or break a sunkissed look. You want that natural flush you get from spending time outdoors, not the obvious “I applied blush” look that screams artificial.
I apply peachy-pink blush to the apples of my cheeks and blend it upward toward my temples. This mimics how your face naturally flushes from sun and warmth. The key is building slowly—start with less than you think you need.
Blush application that actually works: • Smile to find the apples of your cheeks • Apply blush in circular motions • Blend upward toward your hairline • Add a tiny bit to your nose for that “spent the day at the beach” effect
Pro tip: I use the same brush for both blush and bronzer (after wiping it clean, obviously). This ensures the colors blend seamlessly and look naturally cohesive.
9. Mascara Magic with Brown Instead of Black
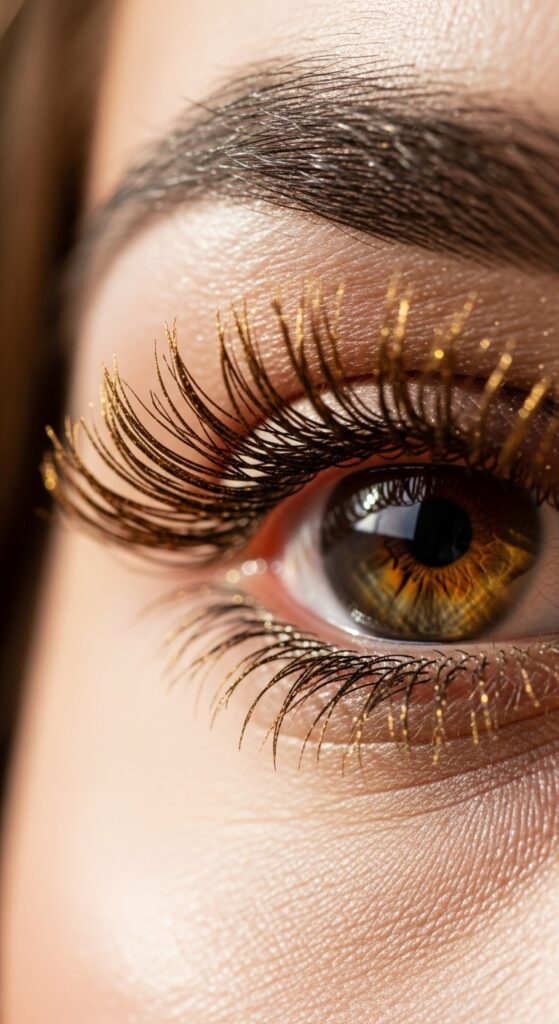
Here’s a controversial take—brown mascara often looks better than black for sunkissed makeup. It’s softer, more natural, and doesn’t compete with all those warm tones you’ve got going on.
I curl my lashes, apply two coats of brown mascara, and sometimes add a tiny bit of golden eyeshadow to my lashes while the mascara is still wet. Sounds weird, but it creates this gorgeous, dimensional effect that catches the light beautifully.
The bottom line? Brown mascara enhances without overwhelming, especially when you’re going for that effortless, sun-soaked vibe.
10. The Finishing Touch: Strategic Bronzer Placement
Let’s end where we started—with bronzer, but this time we’re talking about those finishing touches that elevate the whole look. After you’ve done everything else, go back in with a light hand and add bronzer to unexpected places.
I dust bronzer along my hairline, down my neck, and even on my shoulders if they’re showing. This creates continuity and makes the whole sunkissed effect look believable and natural.
Final bronzer checkpoints: • Temples and hairline • Sides of your nose • Neck and décolletage • Shoulders and arms if exposed
The goal is to look like you’ve been kissed by the sun, not like you applied makeup. These finishing touches are what separate a good sunkissed look from a great one.
Your Golden Hour Glow Awaits
Creating that perfect sunkissed, golden hour vibe isn’t about using the most expensive products or following complicated tutorials. It’s about understanding how warm light naturally enhances your features and recreating that effect with the right colors and placement.
The beauty of these looks? They’re forgiving, beginner-friendly, and absolutely gorgeous in photos. Whether you’re heading out for brunch or just want to feel more radiant during your daily Zoom calls, these techniques will give you that coveted golden hour glow any time of day.
Now go forth and glow, gorgeous—the sun-kissed goddess look is waiting for you 🙂